Pierwsze kroki
Po włączeniu gry zostaniesz powiadomiony o ustawieniu nazwy użytkownika, zaraz po tym zostaniesz zapytany czy chcesz zagrać na mapie instruktażowej - zaleca się, aby na ów mapie zagrać, ponieważ poznasz na niej podstawowe sterowanie i mechaniki.
W menu głównym wybierz opcję Graj, a następnie wybierz serwer; nowym graczom zaleca się dołączenie na mapę Tutorial. Gracze początkujący najlepiej poradzą sobie na serwerach typu Novice. Po zrozumieniu podstaw gry możesz spróbować swoich sił na trudniejszych serwerach typu Moderate lub DDmaX. Aby zobaczyć te mapy w wyszukiwarce, musisz usunąć słowo 'Novice' z filtrów wyszukiwania.
Podstawowe sterowanie
- Aby poruszać się w lewo i w prawo, użyj klawiszy A i D, skok natomiast przypisany jest do Space.
- Na środku ekranu umieszczony jest kursor, którym celujesz używając myszki.
- Aby użyć haka, wciśnij lub przytrzymaj prawy przycisk myszki. Dzięki temu możesz przyciągnąć się do przyczepialnej kafelki lub innego tee.
- Lewy przycisk myszki pozwala na strzał lub użycie wyposażenia, które aktualnie posiadasz.
- Aby włączyć menu emotek wciśnij klawisz ⇧ Shift. Emotki używane są w celu komunikacji z innymi graczami bez potrzeby pisania na chacie tekstowym. Pistolet może służyć jako wskaźnik drogi, natomiast emotka typu przedstawia odczucia gracza związane z bieżącym etapem mapy.
Główne mechaniki
Hak
Długość ![]() haka to około 11 bloków, chociaż zasięg jest nieco inny w przypadku przyczepialnej kafelki a innego tee (ze względu na różnice w hitboxie)
haka to około 11 bloków, chociaż zasięg jest nieco inny w przypadku przyczepialnej kafelki a innego tee (ze względu na różnice w hitboxie)
Użycie haka na przyczepialnej kafelce przyspieszy cię w kierunku końca haka, aż do osiągnięcia maksymalnej jego prędkości(około 20 bloków na sekundę).
Użycie haka na innym tee, zarówno przyciągnie go w twoim kierunku w szybkim tempie, jak i ciebie w jego kierunku w wolniejszym tempie.
Zamrażające kafelki
Tee, który wpadnie w / zamrażającą kafelkę (skin zmieni się na skórkę ninjy) nie będzię mógł się ruszyć. W przypadku wyjścia ze standardowej zamrażającej kafelki, będziesz unieruchomiony na 3 sekundy lub do momentu aż inny tee użyje na tobie młotka. Młotek nie zadziała w przypadku głębokiego zamrożenia.
Na niektórych starszych mapach może pojawić się serce, które działa w identyczny sposób do zamrażającej kafeki, lecz ma większy hitbox.
Skakanie
Wciskając Space możesz skoczyć. Skok tee dzieli się na ten, który wykonywany jest z ziemi i na ten, który wykonywany jest w locie. Skok powietrzny może być użyty więcej niż raz.
Skok po ścianie można wykonać tylko na ścianach oznaczonych odpowiednią kafelką ; spadając w dół musisz dotknąć tej kafelki.
Weapons
A tee always starts with the following weapons:
These are weapons that can be collected in maps that feature them:
Basic Techniques
Personalizing your tee
Most of the personalization can be done in the settings.
Player Tab
Here Name, Clan and Flag can be set for the main tee and the dummy.
Tee Tab
This tab allows for changes to the ingame appearance.
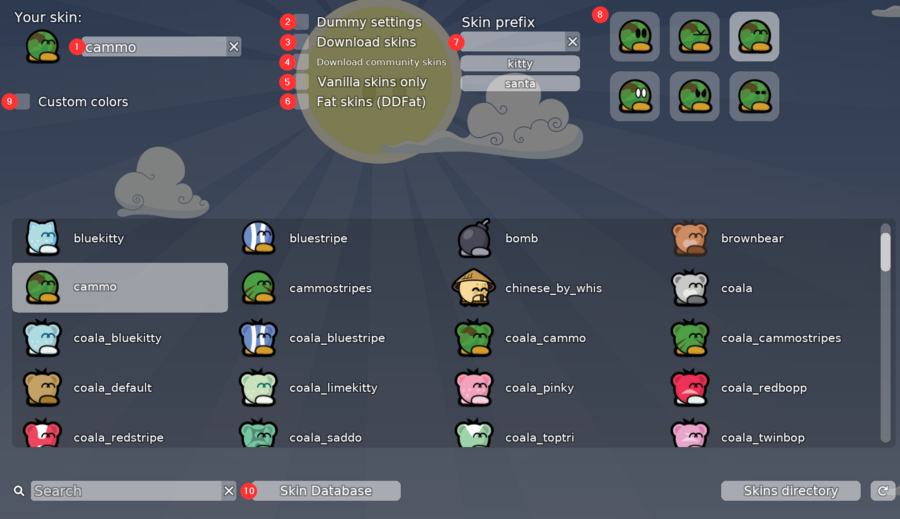
- In this field, the name of the skin can be manually entered (case sensitive). This is necessary when using a skin that is not listed in the big list below.
- If this setting is checked, the settings for the dummy can be edited.
- This enables the use and display of skins from a database. If this is disabled and another player uses a skin that is not available locally, the default skin will be displayed instead.
- In the official skin database, skins are divided into "normal" and "community" skins. When this checkmark is set, community skins, which may appear less "teelike," will be downloaded.
- This disables all but the original vanilla skins, even other local ones.
- This is just a fun setting to fool around with. However, other players can only see the effect, if they have enabled it as well.
- Some skins have multiple variants. For example, in the screenshot, the selected camo skin and coala_cammo can be seen. In this case, "coala" is the prefix. With this field, variants for such skins can be easily switched, although the same result can be achieved by using the variant directly.
- Here, the eyes that the tee will use when joining a server can be set.
- This setting allows for the customization of the body and feet colors of the tee.
- This button opens the website of official Skin Database.
More skins can be found in the Skin Database (10) in order to use these (3) needs to be enabled and (5) disabled. To use community skins, (4) needs to be checked as well. To apply the skin, the name of the skin has to be entered or copied into (1).
There are other databases like skins.tw with even more skins than the official database. But they have to be integrated separately to use.
Appearance Tab
Here are settings about the HUD, Chat and other general visuals located. Other players cant see the effect of these settings.
Assets Tab
Here can ingame textures be selected. Common places to get Assets are Discord and skins.tw. Other players cant see the effect of these settings.
Get in touch
more resources or looking for non-English-speaking communities can be found here.

